In the world of 3D printing, infill is the unsung hero, quietly holding everything together while you marvel at your latest creation. It’s like the secret sauce that transforms a flimsy plastic shell into a sturdy masterpiece. But let’s face it—most people don’t give infill the credit it deserves. They’re too busy dreaming about their next big print to consider what’s happening inside.
Overview of 3D Printing Infill
Infill plays a critical role in the 3D printing process, providing strength and stability to printed objects. It refers to the internal structure within a model, impacting durability and weight. Different infill patterns, such as grid, honeycomb, and lines, create varying levels of support. Each pattern serves distinct purposes; for example, honeycomb offers a solid balance between strength and material usage.
Materials used for infill often include PLA, ABS, and PETG, selected based on specific project requirements. Density also plays a significant role in infill settings. An infill density of 20% typically suffices for models requiring moderate strength, while higher densities, such as 50% or more, enhance structural integrity significantly.
Layer height is another factor influencing infill effectiveness. Thicker layers can lead to faster prints, but they may sacrifice some strength. Settings should align with the intended use of the printed object for optimal performance. In many scenarios, adjusting infill settings allows creators to tailor their models for specific applications, improving both utility and aesthetics.
Moreover, understanding the mechanical properties of different infills is essential. Some infills offer flexibility while others provide rigidity, catering to diverse functional needs. Designers often experiment with settings to achieve the desired balance between material consumption and performance. Effective infill strategies contribute significantly to the overall quality and longevity of 3D printed products.
Types of 3D Printing Infill
Understanding the types of infill available helps in making informed choices for 3D printing projects. Each type offers unique advantages, affecting the final product’s strength and weight.
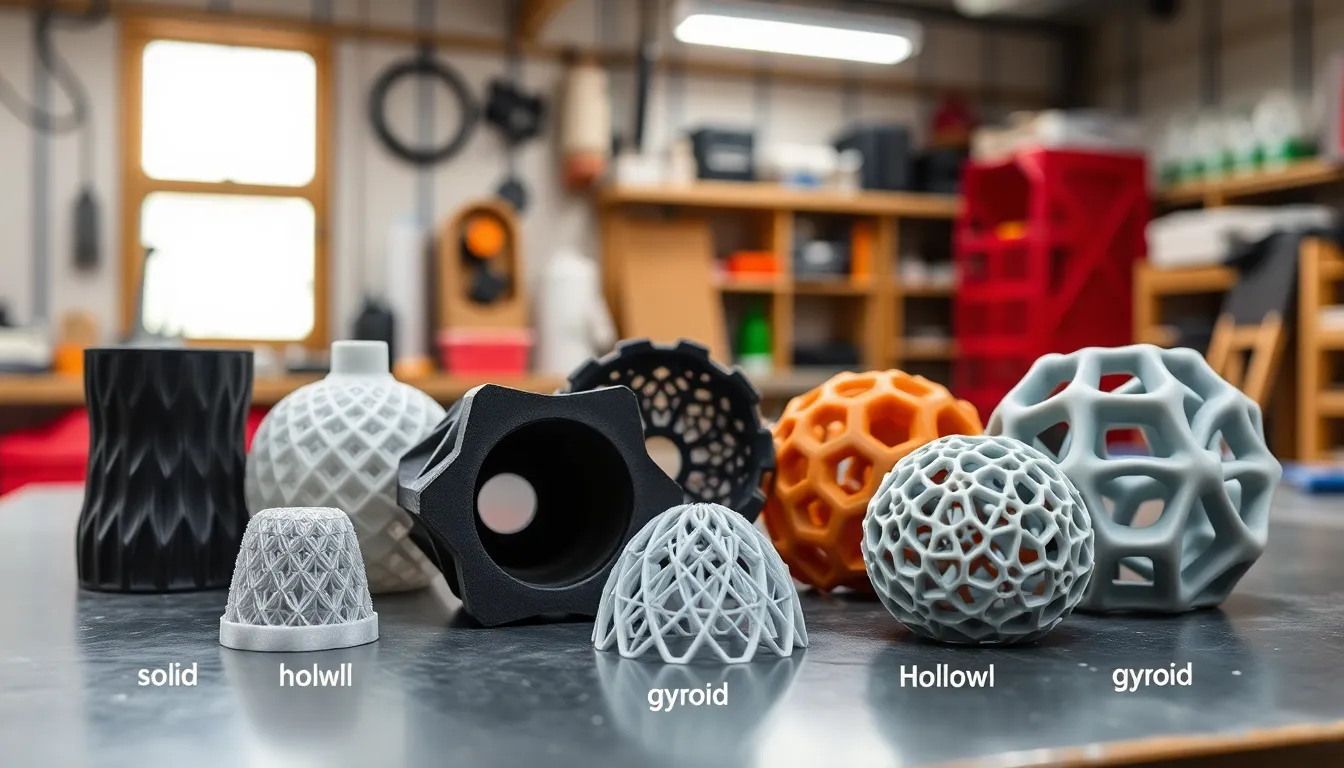
Solid Infill
Solid infill consists of fully filled interiors, providing maximum strength and support for printed objects. Many users prefer this type for functional prototypes and parts requiring durability. When choosing solid infill, consider it suitable for applications where structural integrity is paramount. Various solid infill patterns exist, including blocks and cubic structures, each offering unique load-bearing capabilities. Solid infill significantly increases print time and material usage, influencing project costs. For ultimate strength, a solid infill density between 100% and 80% often proves effective.
Hollow Infill
Hollow infill presents a more lightweight alternative to solid options. Crafted with minimal internal structures, hollow infill reduces material consumption while maintaining reasonable strength. Users often find this infill type ideal for decorative items, where aesthetics outweigh functionality. Popular hollow patterns include single or double walls, allowing designers to balance strength with material use. Typically, hollow infill works well at densities ranging from 10% to 30%. Projects benefiting from hollow infill often focus on lower weight and faster print times.
Gyroid Infill
Gyroid infill features a complex, wavy pattern that combines strength and flexibility. This type is increasingly favored due to its efficient material usage and excellent load distribution. Many 3D printing enthusiasts appreciate gyroid infill for its unique blend of rigidity and lightweight characteristics, making it suitable for a variety of applications. The intricacy of the gyroid structure enhances infill effectiveness at lower densities, often around 20% to 30%. Users can also expect shorter print times compared to solid infill while achieving a robust final product.
Factors Influencing Infill Density
Infill density significantly influences a 3D printed object’s performance and quality. Various factors determine the appropriate density needed for specific applications.
Mechanical Strength
Mechanical strength directly correlates with infill density. Higher densities enhance structural support, making objects more durable. For instance, a density of 100% offers maximum strength for functional parts. On the other hand, lower densities, such as 20%, provide sufficient strength for decorative items and prototypes. Different infill patterns, like honeycomb or gyroid, also affect strength characteristics, allowing designers to make informed choices according to their needs.
Print Time
Print time varies with infill density. Lower densities reduce the amount of material used and the time required for printing. For example, a 10% infill can cut print time considerably compared to a 40% infill. Additionally, infill patterns influence the printing speed. Simple patterns like lines may print faster, while more complex designs can extend the duration. Balancing print time with the desired object strength remains essential for optimizing printing efficiency.
Material Usage
Material usage hinges on infill density and pattern choices. A higher infill density directly increases material consumption, impacting project costs. For example, a functional part could require 50% density, whereas aesthetic items might only need 10%. Selecting efficient infill patterns, such as gyroid, can yield effective material usage without sacrificing performance. Optimizing infill density assures a well-balanced approach, achieving cost-effectiveness while providing adequate support.
Best Practices for Choosing Infill
Choosing the right infill can greatly influence the performance of a 3D printed object. Understanding the intended purpose of the print ensures optimal selections that meet specific requirements.
Understanding Your Print’s Purpose
Defining the object’s purpose provides clarity on the necessary infill type. For functional prototypes, solid infill delivers maximum strength, while decorative items benefit from hollow infill’s lightweight nature. Analyzing factors such as stress points helps pinpoint the right infill density. Less demanding applications might only require 10% to 20% density, whereas functional designs often necessitate higher densities for added durability. Mapping out the function early in the design process streamlines the infill selection, aligning it with performance goals.
Balancing Strength and Weight
Striking the right balance between strength and weight is crucial for effective 3D prints. Higher infill densities provide superior strength but increase material usage and print time. A density of around 20% typically suffices for moderate strength, while 50% to 100% densities are essential for high-stress applications. Exploring various infill patterns like honeycomb or gyroid can help improve balance without excessive weight. Designers should prioritize factors such as application needs and material costs, creating a more efficient printing process. Each modification influences not only the durability of the model but also its practicality and functionality.
The role of infill in 3D printing can’t be understated. It’s the backbone that supports the overall integrity of printed models. By selecting the right infill pattern and density, designers can significantly enhance the durability and functionality of their creations.
Exploring various infill types allows for a tailored approach to each project. Whether aiming for strength or weight efficiency, understanding the implications of infill choices leads to better outcomes.
Ultimately, a thoughtful infill strategy not only improves the quality of prints but also optimizes material usage and printing time. As 3D printing continues to evolve, mastering infill techniques will remain essential for achieving superior results.